|
Secrets of Digital Photography Nikon 995 and Slide Dupes |
|
Jump back to Breaking News... New features produce new techniques. Here's one now! |
Slide Copy Adptr! There it is: A new lens converter setting for--what's this? A slide duplicator? How does that work? If you have the solid, rugged, flexible Nikon ES-E28 Slide Copying Adapter, you already know about how it attaches firmly to the face of your camera by screwing into the 28mm threads at the front of your 995's lens. You already know how well built it is and how it can adjust its angle, X and Y positioning so you can crop well into a 35mm slide or film strip using its slide and film strip carriers, so I don't need to tell you anything about them. Slide and film copying is very easy to accomplish once you get all the variables locked down. The ES-E28 is mechanically simple and quite easy to figure out, but beneath that pretty face a couple of "issues" are hiding. Things that could lead you into some serious head scratching. The device is essentially a tin can with a diffuser on one side of a slide holder, the camera on the other. Macro focus mode will get you in close to the slide and since the Macro zoom position is not a single fixed position, rather it is a range, you can zoom to crop into your slide or film strip 35mm frame. If you have ever pointed it at a light expecting the illumination to be evenly distributed behind your slide or frame of film, you know how that diffusion material can create the mother of all hot-spots, too. Jeez! Who selected that material? Holy cow, that stuff isn't even close to right.
Trouble is, the bulb thing doesn't work. There's that humongous hot spot, again and forever. The image here was taken two feet from an incandescent bulb and the hot spot can be seen to be an IMAGE of the bulb. Yes, friends, you can actually see certain images through the diffusion material. It is what we cinematographers call a "partial diffusion" effect and the world of production resources fabricated for cinematography and lighting holds an answer. The image of the hot spot here was made by manually focusing the camera at its nearest point, which is why the edges of the bulb don't look sharp. In fact, any striking highlight will read as an image through the Nikon diffusion material. So it needs a bit of diffusion helper. For general shooting with a desk lamp you could add another diffusion layer to the ES-E28. LEE Filters makes a sample kit of filter swatches that will help. It's the Cinematographer's Edition and at 3 x 3.75 inches, it's big enough to cut a 54mm circle of #216 White Diffusion material out to sandwich with the Nikon diffusion material. (http://www.leefilters.com/)
Open a blank white window in Photoshop and you can even tint the image for color correcting images. As long as you hold the Nikon Copier a few inches from the screen, you have an amazingly repeatable, even, solid light source. Positive about Negatives The Nikon Coolpix 995 has a new feature never seen before. Their documentation is minimal, but mine isn't. The feature is called Inverse Color and it is one of two choices next to the Slide Copy Adptr Lens setting. The other selection is Positive. Both settings reduce the contrast of the camera and set odd EV adjustments. Inverse Color is for shooting color negatives and it locks out the white balance adjustments. That means you must use colored light to correctly paint your negatives in order to get them looking right. You are about to discover what every color lab already knows: Every single image you shoot on negative color film is different and must be individually colored, exposed for and tweaked. You will be able to zero in on the colors for one negative only to find that the very next negative needs a very different setting. For dealing with upside down color, you have to develop a negative attitude. In this world an image that is too dark needs less exposure and a shot that looks too green needs more green to fix it. By using your computer's screen you can make minute color adjustments to the blank image you are using as a light source, thus getting closer to the right color and density of your film image through a series of successive shots. iNova's Negative Attitude Lesson: 1. Place the negative strip you wish to copy from in the Nikon strip holder and make sure the camera is set to Menu Page 1>Lens>Slide Copy Adptr>Inverse Color. 2. Set the camera to full Manual (M) exposure mode. Your exposure will be somewhere in the range of 2 seconds at f/3.3 at ISO 100. This means that other exposure types (A/P/S) won't do. 3. Open a blank white window in Photoshop or Photoshop Elements on your computer screen. This should be large enough on screen to be twice or three times the diameter of the Slide Copier. 4. Set the camera to VGA. No sense wasting lots of storage space until you get the color right. 5. Index the negative you wish to shoot into the copier. It will already be set to Macro mode and if the monitor on your camera is all white, you may need to switch to "Positive" to frame the shot. Continuous AF is also a good idea. 6. Make sure that NR is ON. (Bottom of Menu Page 2) The 2 sec exposure will need its benefits. 7. Shoot a first test with the white screen as your light source. Point the Slide Copier into the center of the window about 2-3 inches back from the screen. 8. It won't be right. The image will have a tint. Now you must create a color that is exactly like the tint in the picture and turn the window into that color. If the image is too yellow-orange, you will be trying to make the window that much yellow-orange. Since you are shooting a negative, the amount of "color wrongness" in the shot is equal to the appropriate amount of color rightness you must create in the light coming off the computer screen. You can use any of the many ways Photoshop can generate a new color to do this. From the white exposure, you know which general direction your next tint should be. Select a color about half as strong as what you think it should be and shoot another VGA test. Keep making smaller and smaller increments of change as you get closer to the right color balance for the shot. It won't be perfect and you will need to do some color repair work on the image later. Don't get discouraged, it can take ten tries before you get the hang of it.
The illustration shows how a HSB color wheel representation of your color can help. Here the x shows the current corrected color and the circle shows the approximate tint in the current test image. Appropriate adjustments to the current color are along a line between the two. The small arrows indicate the fine increments of change you should try as you move from one color in the direction of the other. 9. Eventually you will see colors that look fairly good. Now change the camera resolution to full size or UXGA and take the final image. Throw out the VGA test shots 10. Adjust for color deficiencies when you bring the shot into Photoshop. It is not unusual to have shadows that are carrying too much color while highlights look just fine. Your proficiency in Photoshop color correction will be needed for almost every image.
|
|


 In
fact, Nikon recommends that you point the rig at a light box--itself
a well diffused source of light--or, if you must, a bulb at least
18 inches from the Copier. You know, to prevent heating the rig
too much. I am not making this up.
In
fact, Nikon recommends that you point the rig at a light box--itself
a well diffused source of light--or, if you must, a bulb at least
18 inches from the Copier. You know, to prevent heating the rig
too much. I am not making this up. Say,
wait a minute! Why not use the PERFECT light box that has been
staring us in the face for the last few minutes? Yeah! I'm talking
about the computer screen right in front of our collective noses!
Open a blank white window or page on screen and do the White
Preset trick to balance for that light and suddenly you have
a perfectly diffuse light.
Say,
wait a minute! Why not use the PERFECT light box that has been
staring us in the face for the last few minutes? Yeah! I'm talking
about the computer screen right in front of our collective noses!
Open a blank white window or page on screen and do the White
Preset trick to balance for that light and suddenly you have
a perfectly diffuse light.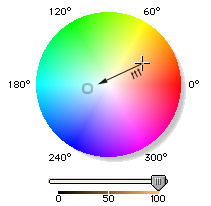 When
you go too far with your color it will turn out the opposite
color you intended. Back off toward white and try again. If the
image is too light-increase the time of the exposure or open
the lens up. More light = darker image.
When
you go too far with your color it will turn out the opposite
color you intended. Back off toward white and try again. If the
image is too light-increase the time of the exposure or open
the lens up. More light = darker image. Get
the eBook
Get
the eBook