| Home |
Convenience vs. The Right Thing. Photoshop is The Leading digital photographic editing program. Period. As I have pointed out numerous times, being a master of Photoshop will land you jobs. Being the master of other image editing software may not, unless it's for the manufacturer of that other program. Sure, there are specialized image editing programs for film and video visual effects artists, but nearly every visual effects workstation in Hollywood to New Zealand has a copy of PS on board. There's a Very Good Reason that "The Leading" in the first paragraph is capitalized. With PS CS2 have come a number of new features. Some of them I've discussed... or taken to task... on pages around here, previously. And now for some Deja View all over again.
In those days, it was the native barrel distortion for the CP950 compact camera which taught us several things.
Now, with PS CS2 comes a new Plug-In under Filters > Distort > Lens Correction that promises to rid your images of barrel and pincushion distortions with a simple slider. On the same page are Rotation (for tilted images), Vignette control, Chromatic Aberration and two sliders for vertical and horizontal Perspective Transformations. You can also switch on and alter an overlay Grid to check your work plus an Edge generator of sorts. More on all of these, coming up. It's great to have all these controls organized on the screen at once, and for routine adjustments the controls are a welcome mix. Chromatic Aberration control is perhaps the cleanest implemented. When lenses are computed, designers have a problem: Light of different frequencies pass through glass and bend to a greater or lesser degree depending on their wave lengths.
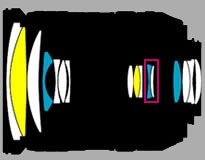
That's one of the major reasons even simple, prime lenses can have 6 or 8 elements. And controlling this aberrant color phenomenon causes zoom lens element counts to fly high into double digits. My 18-200mm VRII Nikkor (seen here) has 16 slabs of glass on board in 12 groups.
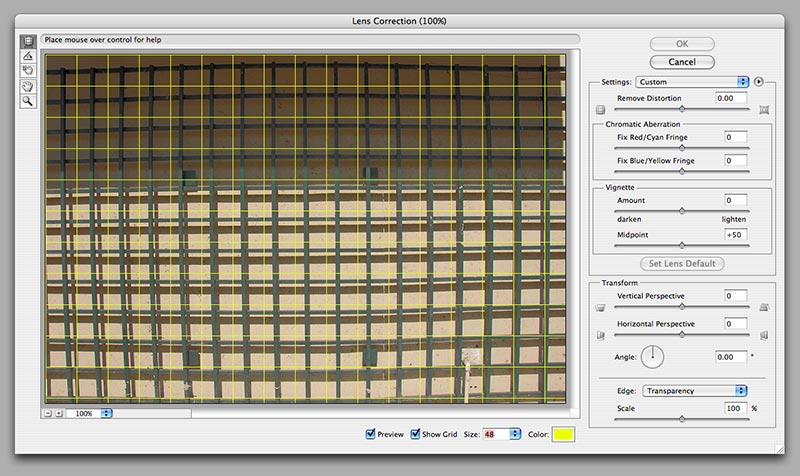
The reason the five are pair-bonded is to bring two different light-bending glasses together to better control one thing only: Chromatic Aberration. One glass formula swerves color this way, the other bonded element swerves the color back on track. But what happens in Reality? Designers can only take it just so far. Micro-Nikkor lenses and the upper telephoto primes are just about perfect, but ALL zoom lenses are balancing so many compromises that some barrel distortion, chromatic aberration or vignetting is virtually bound to occur. Which brings us back to why Adobe created their Lens Correction window. Frankly, it was a major need. Below you see it at its smallest practical size, slightly reduced here, but readable. We will get to that bulge in the shot in a moment. The Chromatic Aberration controls here are great. Whether the effect shows up as Red/Cyan or Blue/Yellow --and it often shows as a mix of these--, the sliders give you fine control. To use it, blow the image up huge (200% or more) and crawl into the corner of the shot where Chromatic Aberration is most egregious. Moving the sliders allows fine control interactively.
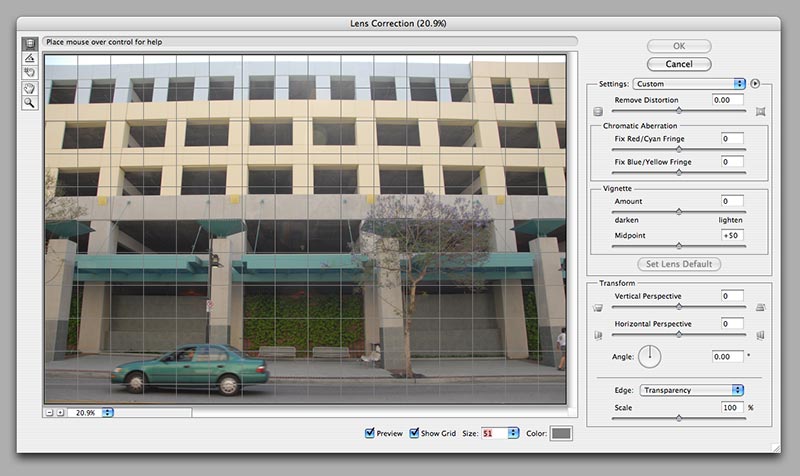
If this image had contained significant corner darkening, the Vignette control would have allowed quickly fixing that. One can even set the Midpoint, to fine tune the effect. The Transform controls are a mixed bag. The Vertical Perspective and Horizontal Perspective controls allow quick twisting and tipping of the image to correct slight--and even severe--angular offsets. For a shot like the one above, a tad of Vertical Perspective would flatten out the image of that trellis quite well, but be aware that this is not the solution to architectural images shot at an angle, upward or sideways or both. As you tip a flat image, it stops being correct in its vertical vs. horizontal linearity. Tipping an image of a building so the vertical lines are parallel also has the effect of reducing its height on screen. Rollover the Garage shot to see this. For a 1 or 2 -degree tilt, this is almost irrelevant. Our eyes forgive the tiny change, but for an architectural changes like the scene above, simply tipping the image upright isn't doing the job. Notice that the car's wheels are no longer true circles? They've become slightly squashed ovals, slightly, due to the perspective change to the image into which they were originally captured. Notice that I said "perspective change to the IMAGE, not to the building. But what you really want is to perspective change the building, not to distort it by only changing the flat plane of the image. View cameras deal with this routinely, and avoid squeezing the image. Other controls in Photoshop will let you fix this, and our eBooks have a Tutorial plus some Actions that let you learn how to do it better, without this Lens Correction window. Notice that to see the whole tipped image, the bottom control: Edge > Transparency was set to 87% (which changes the image scale, shrinking it to 87% of what it started as). That was necessary because when the Vertical Perspective was tipped to a setting of -35 (this is not a number in degrees) the top of the picture twisted beyond the frame above the extents of the window. For whatever reason, the designers of this control thought that keeping the original dimensions of the window was more important than doing the Right Thing. An experienced photographer would be loathe to trim away important visual material. She would have changed the size of the window before discarding part of the image. Simply reducing the reproduction scale didn't help. Whoever designed this tool has not had a lot of photographic experience, and I would venture to guess that he never had to actually correct more than a handful of images in his life and has never touched a view camera with swings and tilts integrated into its design. Which brings us to the last (although top) feature of this Lens Correction cluster. The top notion is called Remove Distortion and that could mean Barrel Distortion or Pincushion Distortion, both of which show up in zoom lenses, usually as barrel at wide angle zoom settings and pincushion at tele settings. The slider moves right for positive barrel distortion corrections and left for negative number pincushion corrections. I have a problem with this control. It does a poor job of correcting real-world lens issues. Very few actual zoom lenses make the kind of distortion that this control addresses. Here's the trellis example in more concrete terms. When I shot the Trellis image, it was to test the effect of our own iNovaFX Photoshop Actions for the D200/D80. As you can see, it has its share of barrel distortion. While the actual trellis is not a perfect grid, having been designed to less than perfect tolerances, the bulging center is very obvious. The same lens shooting a natural scene won't reveal this nearly as much, since nature has few straight lines. You'd never notice it in a portrait, a mountain vista or a picture of an athlete running. Not unless architecture, the horizon or some straight-line prop were in the shot. Rollover the shot to see what the iNovaFX Photoshop Action iBCD200 > iBC18-200@18 does to the image. Within a few seconds the barrel distortion is flattened within ��2 pixels of linear perfection overall, with special emphasis on perfecting the outer edges even greater because they may become part of an overlapped, stitched panoramic image. We are interested in actually tweaking an image like this into being a portion of a more demanding process. Now let's see what Photoshop's Lens Correction window does with the same shot. Click and hold the above image to see what our best guess achieved. Here the Remove Distortion is set to +4.5 and the center seems quite straight, but what is happening with those corners? They are bending AWAY from the direction of the correction. Click on either the full frame Trellis or upper Garage images to see what happens with Photoshop's Remove Distortion feature. We have always been aware of--and spoken of--the true nature of barrel distortion as is appears in real-world optics. We call it "M distortion" because the true nature of the beast is like a very shallow M as seen along the top bar of the trellis. The fix for Barrel Distortion is not a simple, easy one-step process. Fixing it for any of the Nikon, Canon, Sony and/or Sigma lenses we have written iNovaFX Actions for is an intricate process, sometimes more than 20 steps in complexity. While this feature may be fine for non-critical work, it's not a true Photoshop-level implementation of a Lens Correction. Adobe, you could have done better, and you should have. iNovaFX Parallels Before Adobe arranged these controls in this window, they had studied certain of the iNovaFX Photoshop Actions. Adobe has purchased many copies of the eBooks since The Year 2000, and we have discussed including some of these with versions of Photoshop with Adobe's product managers over the years. We implemented Chromatic Aberration tools in 2001 and now include precise metric CA correction iNovaFX Actions in our DSLR eBooks. You don't need PS CS2 to make them work. Any Photoshop from PS6 onward can use them. The PS CS2 implementation of the idea is first rate. We showed Barrel Distortion correction in 2000 and have improved and customized it ever since for the Nikon, Sony, Canon and Sigma lenses we have written about, ever since. You don't need PS CS2 to use them. The PS CS2 implementation of the idea is poor by our standards. The reason for this is fundamental: Photoshop's feature designers are unaware of the true compound-curve nature of barrel distortion phenomena. Perhaps they'll read this and get it right the next time. But with the PS CS3 Beta, they haven't seen the light, yet. We introduced Vignette Controls and revealed how they could be used to both create and eliminate vignette effects in 2002. You don't need PS CS2 to use them. Photoshop CS2's implementation of this is great. We have taught how to achieve superior perspective correction (architects take note) with view-camera precision for years. PS CS2's implementation of this notion could have been MUCH better. On this, slight corrections are fine and any serious corrections are best left up to experience, know-how and other tools within Photoshop. While Photoshop offers the File > Automate > Photomerge option for multi-segment Panoramics, it's not as refined as it could be--or maybe automation can only take images like panoramic segments just so far. Initially, we taught and supported a much more precise, but much more difficult method of achieving high quality panoramic images. Lately, we have created a hybrid stitching process that uses the strengths of Photoshop's Photomerge feature in combination with instructions that achieve high-quality panoramas. Future iNovaFX from Adobe? There are many other features within the iNovaFX library of Photoshop Actions that Adobe might peer at to co-opt and include in future Photoshop Plug-Ins. Our iBaby selective focus effects, our after the fact halo filters, cross star filters and grad filters are prime territory for future uncredited inspiration and appropriation by Adobe. We will, as always, continue to credit our complex assemblies of Photoshop's features to Adobe and Photoshop in particular. Morals to the Stories When you implement the Lens Correction Filter in Photoshop CS2, you are rewarded with convenience in Chromatic Aberration and Vignette control. The Transform controls are somewhat problematic, being limited in their scope of graphic integrity and the Remove Distortion control is much less useful than it claims to be, providing only simple spherical correction which is of only marginally better appearance and nowhere near true correction of Spherical Aberrations. Unlike the iNovaFX Photoshop Actions, the Photoshop version does work interactively on images of any focal length and file size. To obtain equal degrees of Chromatic aberration and nearly equal Vignette control, the iCrAb-series of iNovaFX Photoshop Actions brings equal and near equal control to images of any size. For true view camera-like swings, tilts and perspective corrections, pick up one of our eBooks and browse its tutorials. These sorts of corrections are not the stuff of single slider alterations, but they can be achieved, once you know how to follow a short list of steps. For what it's worth, we've seen other helpful resources get the idea of post-camera perspective changes wrong to various degrees, so it's understandable how computer programmers might miss the fine points. This writer has spent considerable time and effort working out the intricate details of view cameras (8x10 and 4x5!) so writing down the things to pay attention to is not a guess. -iNova
|
|
 By the year 2000, Conan O'Brien had foreseen everything, but he missed the fact that we, here at iNovaLabs, had solved one of digital photography's more vexing issues; barrel distortion.
  Red flows through at a tiny angular offset from blue, for instance. That causes the focused red part of the spectrum to be ever so slightly larger than the blue portion of the image. So the designers use exotic glasses and minerals as optical elements to steer all the colors back on top of each other.

