|
The appropriate iCC-series filter can be used to get
the image back to where it should have been, but there is a fast,
"approximate" method you can use within Photoshop.
White balance
attempts to interpret the scene by shifting its center of Red
/ Green / Blue sensitivity up and down a scale of coloration
defined as "color temperature." One end of that scale
is rather gold, the other rather blue. When it's not set right,
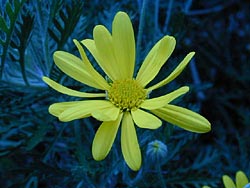
images like the sick flowers, above, are the result.
We all
know how warm the interior lights of a house can appear to our
eyes when we view the house in fading twilight. The incandescent
lamps have a gold color while the post-sunset sky seems to paint
the world in cool blue light. If we have been outdoors for a
minute or more, the interior lights can look almost impossibly
warm, yet when we go indoors, the light seems to be full-spectrum
and not so tremendously warm at all.
Obviously,
eyes adapt better than cameras. Using the Auto white balance
setting will largely avoid problems, but it makes a white balance
estimate with every shot and can be fooled by objects that have
predominantly blue or yellow in them.
Digital
cameras lock the white balance with the presets, Sunny (Fine
in some Nikons), Cloudy, Flash, Incandescent, or Fluorescent
(usually with variations).
Not all
cameras have the complete range and some professional cameras
let you set the color temperature directly in degrees Kelvin.
You could
perform a Manual white balance in the light you are using, but
many situations make doing that unlikely. With all these choices,
one can easily make mistakes. Every day, millions of dollars
worth of film gets shot under the wrong white balance. And when
that happens, millions of photographers slap themselves in the
head. Fortunately, you are shooting digital or you wouldn't be
reading this...
Fixing
off-white balance
Images
like the sick-looking flowers against the blue wall, above, are
the result. Most people would simply erase the image and save
themselves the embarrassment.
Now run
your cursor over the image. It will change into the correct white
balance. The method for achieving this is almost as easy as viewing
it.
But you
will need Photoshop or an image editing program that has the
same features which makes this possible.
 In
Photoshop open either the Curves or Levels window. There you
will see three "eyedroppers". They suck up the value
of pixels they click on. In
Photoshop open either the Curves or Levels window. There you
will see three "eyedroppers". They suck up the value
of pixels they click on.
The end
ones are used to establish the light and dark points of the image,
and the middle one is used to establish the gray point of the
image. That's the one which will help fast-fix the shot with
the poor white balance.
Insta Fix
Or, Hunt
for the Gray...
Select
the middle eyedropper and click it on anything you think should
be gray. The relative brightness of the gray object isn't terribly
fussy. Click around until you find a pixel that brings the rest
of the image into decent coloration. It may take several tries.
Note: You CAN set the middle
eye-dropper to a different color than middle gray for other effects.
Double click on it and a color-selector will appear. As long
as its reference color is neutral gray, this technique will work.
You can set it to neutral gray by making each RGB value =128
or 50%, or by entering 50% into the B-field of an HSB (Hue, Saturation,
Brightness) setting while setting the H and S fields to zero.
If your
shot simply doesn't have an appropriate neutral pixel in it,
another nearby shot may. In the example above, the wall of gray
stones helped, but almost anything such as pavement, walls, tires,
paper, clothing, tree trunks, whites of the eye, teeth, trim
on a house, curbs, sidewalks, pidgeon feathers, pets, or clouds
may work.
Before
you close the Curves or Levels window you can go to the individual
Red / Green / Blue channel windows and adjust the gamma point
by hand if you wish. This also has an effect on the color of
the image, and the Red and Blue ones make the most white balance-like
differences.
|
Get the eBooks. DSLR Nikon D70, Coolpix and Sony Advanced Cyber-shot titles available.


