 Photoshop doesn't do
everything automatically. Photoshop doesn't do
everything automatically.
So these
filters automate Photoshop.
Packed
with the eBook is the full set of iNovaFX filters. They're both
on the same CD so you can read the book while clicking into other
software instantly.
The filters
aren't a complete panacea for all that may ail your images, but
they get a lot more out of Photoshop than you might imagine.
Some of them make things possible that you would probably miss.
They use the
full range of Photoshop. They
won't work with Photoshop LE or Photoshop Elements or other editing
programs, so they must be used with the latest full versions
of Photoshop 5 through 6.
Some of the things they
do include:
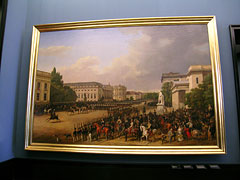 Barrel Distortion Correction. Barrel Distortion Correction.
Not trivial, the several versions tackle
everything from the slight barrel distortion of the camera zoom
at wide angle to the rather pronounced barrel distortion of the
WC-E24, the somewhat milder barrel distortion of the WC-E63,
and the Extreme (!) barrel distortion of the FC-E8 fisheye
when it is used on the camera at tele zoom.
The example here is from a CP5400, shooting
a huge painting in the German National Museum. Roll your mouse
over the picture to see the effect of removing the barrel distortion.
- The slight pincushion distortion at full
tele zoom and with the TC converters is covered as well.
There's even a variation that lets you
put in your own number to create a pincushion or barrel distortion
correction of your own, "to taste".
|
- Chromatic
Aberration Correction.
When lenses focus an image, it is easy
to have different colors in focus at different depths behind
the lens. Your eyes don't see the world this way, but even a
simple magnifying lens demonstrates this problem. The result
is an image that has the Red, Green, and Blue parts of the picture
showing at different SIZES!
- These filters selectively shrink or enlarge
different colors and crop the results so you get an image that
looks right. A sample page here shows how it works.
|
Four kinds of color correction are provided
in four series of filters.
- One is a group of filters to fix the color
when the camera was set to the wrong color temperature.
A special page here
describes that process. Because colors are so tremendously mangled
when a camera shoots in sunlight with its white balance set to
incandescent, for instance, certain corrections have more than
one option so you can choose the one that seems to fit your scene
the best.
 Another
series lets you warm or cool images to taste, and a variation
allows you to precisely tint your images with cyan, magenta and
yellow filtration modeled on the CC series of filters used in
chemical film camera and darkroom operations. Another
series lets you warm or cool images to taste, and a variation
allows you to precisely tint your images with cyan, magenta and
yellow filtration modeled on the CC series of filters used in
chemical film camera and darkroom operations.
Most images are helped with the warmer/cooler
idea, and finely precise work with the CC-like filters will require
careful printing.
- Worst-case lighting problems are also
tackled.
Sodium vapor lamps, yellow streetlights,
mercury-vapor cold lights, and parking-lot area lights all are
high efficiency, low-color-fidelity light sources created for
cheap illumination, not pretty pictures.
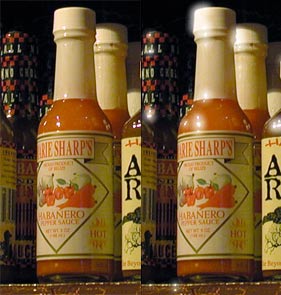
Pictured: The left side is what the
camera could be coaxed to see. The right side is what the image
could be coaxed to be with the right iNovaFX filter.
The filters here in the iSodium series
attempt to make marginal results look closer to life-like. The
distorted spectra of the original scenes are wrestled to the
ground, and while it may not be perfect, it's a lot more real
(right half) than the camera can achieve unassisted.
- Another set pulls certain faded old transparencies
back to reasonably good looking images.
Some transparency film loses the yellow
layer to time. The dye fades leaving an image that looks too
magenta/blue. This filter attempts to fix it, but since every
transparency may differ, expect to finish the recovery with other
techniques in Photoshop.
|
 Here
is an extreme example from a 995. Here
is an extreme example from a 995.
Pictured: The top image was shot at
ISO 800. It was shrunk to 240 pixels wide for this page. That
reduction process gets rid of a lot of grain and noise.
The bottom image was shot a few seconds
later at ISO 800 and EV-2.0!
That's equivalent to ISO 3200!!!
- Then it was recovered using
the iNovaFX Photoshop Action filter iSOfix-under2stops which
is in the iSORecoverPS6.atn folder of filters.
The reduction here hides a lot of grain
and noise, too. But sometimes you just gotta get the shot no
matter what.
- Special variations exist for PS 5 or
5.5 and PS 6.
 These
filters bring out the best-looking results from a digital equivalent
of "push" processing. You get more grain, just as you
do with film, and the dynamic range is somewhat limited, but
you retrieve useful images from otherwise impossible exposures. These
filters bring out the best-looking results from a digital equivalent
of "push" processing. You get more grain, just as you
do with film, and the dynamic range is somewhat limited, but
you retrieve useful images from otherwise impossible exposures.
There's even a filter that lets you shoot
WAY underexposed and fix it later "to taste" in Photoshop.
Try not to hurt your chin when your jaw
drops onto your keyboard.
|
Vignetting has been with us since the beginning
of lenses. It's that darkening at the edges of an image caused
by the geometry of focused light inside the camera. You don't
always see it in images but when you do, you may wish it were
out of the image. The iVignette series tackles it in several
ways.
- Vignetting that is in your face is bannished.
You tune it out.
- Vignetting that is desired --and in some
images it can really add a lot of warmth and focus to the composition--
you get to tune it IN!
Several variations will make this an often-used
effect.
- Long Exposure
Noise Reduction.
Photoshop has some noise reducing tricks
but these filters go way beyond that. These are the filters that
use a "flaw frame" of camera noise, which was made
at the same time a long exposure was shot. Shoot an 8-second
image, then shoot an 8-second image with the lens cap on, within
moments of your original shot. That blank "flaw frame"
is your ticket to a nearly perfect image.
Bring them both into Photoshop, and run
the filter.
- The specks and spots literally become
the templates that pull adjacent color in from surrounding pixels.
Quickly and effortlessly, the isolated flaws cause the original
to heal, and all its blown pixels, noise, and long-exposure grain
melt away.
Over a half-dozen variations let you rescue
unbelievably noisy originals. This filter series produces results
that also fall into the jaw-dropping category.
Of course, if you have the Coolpix 995
or 885, you have a similar feature built in to your camera. Turn
on NR and the camera does it for you. Good feature, that.
- Still, there are times when controlling
the output is desirable. Experience with these iNovaFX variations
will give you that control.
Tiny bright spectral highlights can end
up looking like white spots in the middle of black circles. Sharpness
artifacts can touch a particular type of highlight detail and
 make them look artificial. These filters provide
several different ways of handling the idea and cause varying
degrees of repair and diffusion to sit on top of the highlights. make them look artificial. These filters provide
several different ways of handling the idea and cause varying
degrees of repair and diffusion to sit on top of the highlights.
Pictured: The example here is extreme
and demonstrates a more artistic use of the filter.
This is the largest Glare Flare effect
at the greatest strength.
- Notice how only the highlights are
involved with the effect.
Many of these filters can be tuned to taste
after the filter has run its course. And like many of
the iNovaFX filters, the results often end up as several layers
that invite your continued creative interpretation.
- Hmmm. I wonder what that flare would look
like if it were more colorful... Yep, you can do that, too. Color
the flare but not the image. It's in the eBook.
|
Photoshop has so MANY effects. It would
take a month to try them all. Two sorts of iNovaFX iPS filters
are available:
- The ones that present Photoshop's filters
in a tweaked, optimized, preset format.
- The ones that use Photoshop's filters
in concert with other techniques, even other filters, in more
complex orchestrations.
Pictured: Want a good looking, believable,
water color painting effect? It took me quite a bit of time to
define the right combination of steps to achieve it, and now
you can achieve it in mere seconds. This one also falls into
the jaw-drop category. Careful now.
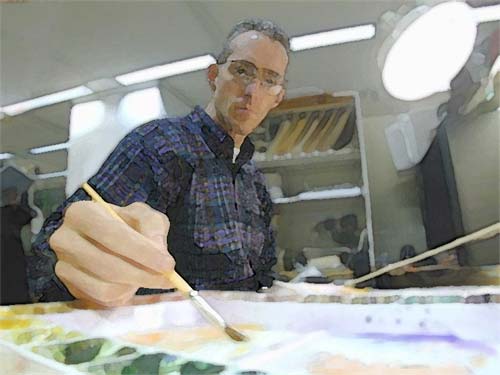
A water color image of a
water color artist! Now print that on a piece of water color
paper...
Some of these filters have a sequence of
over 100 carefully arranged steps. Not the sort of thing you
are likely to accidentally find.
With this series, in a few minutes, you
can try dozens of ideas. Or spend an entire weekend turning your
existing shots into walls full of art.
Many filter effects take a complex series
of steps involving some very counter-intuitive twists. Some of
the FX series take images to places best described as Over The
Top. The one-click
Oil Painting effect, for instance
- Film Black
and White Look.
 If
you convert a color image to black and white in Photoshop, your
means of doing so are many. You can change the image to monochrome
by throwing out all the color in the Hue and Saturation control,
or you can convert the image into Lab color and keep only the
luminance channel. If
you convert a color image to black and white in Photoshop, your
means of doing so are many. You can change the image to monochrome
by throwing out all the color in the Hue and Saturation control,
or you can convert the image into Lab color and keep only the
luminance channel.
You could even shoot in B&W in the
camera for very decent results.
Unfortunately, while you get a black and
white image from each of these operations, you don't get the
look of black and white film, which responds to the brightness
of colors in a unique way.
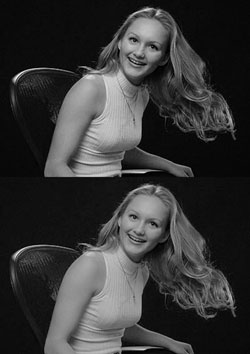
Pictured: Take a good hard look at these
two B&W images. The one on the top is the original simply
desaturated in Photoshop. The one below it has had the iBWfilmFX4
filter run on the exact same color original image without additional
retouching. Lots of things from the original now look better
in the B&W version. Tones of skin, hair, lips, and even the
dark areas of the chair have improved from this complex filter.
Now it has the look of a B&W film image. Shadow detail, color
interpretation and highlight control have all been orchestrated
into the creamy smooth tonal range of Tri-X film but WITHOUT
the grain! (There's a version that adds the grain, if you wish.)
- The filters here give 4 generic B&W
film looks to your color shots while accounting for the odd spectral
changes that many black and white films perform on colorful subjects.
As can be seen instantly above, the skin tones benefit dramatically.
(To see the original color image, check
the lower SuperFlash page.)
- An additional filter lets you add the
effect of a color filter ON THE CAMERA to your image AFTER the
shot has been made.
Add this to your color image BEFORE running
the B&W conversion filter so you can make the conversion
as if you had shot B&W film with a color filter on the camera.
An image on either camera that is shot
using Basic compression will show some of the pixel sized "checkerboard"
artifacts of compression near contrasty contours.
- This filter offers definitive correction
for the idea with a very keen appreciation for not squashing
desirable detail.
You won't need it on Nikon's NORMAL or
FINE compressed images, but you will enjoy the effect when printing
BASIC-gathered shots.
- Film Dynamic
Range Achievement.
On another page
I describe this process and show a contrasty example. The example
in the eBook is much cooler.
- These filters allow you to shoot those
under / center / over trio of images and process the result into
a final image with the press of a single mouse button.
And there are SEVEN variations of the idea
to help tweak your image.
Simply put, it kills color noise.
Run the filter on any shot that shows a noisy red or blue channel
and you will be amazed at how much cleaner the result is when
compared with the original.  On the CD three versions exist in different strengths. On the CD three versions exist in different strengths.
Make your digital images look like images
shot on film.
These are graphic borders that surround
your images with
- iNovaChrome, a mythical 2-1/4 x 3-1/4
roll film (4 variations including one with pseudo-edge fog),
- 4x5 sheet film (2 variations) or
- 35mm film frame (2 variations).
Pictured: A 3:2 original close-up was
simply opened in Photoshop and tweaked to taste. Then the iBorder35.990
filter was run. Automatically, the entire border drew itself
around the shot. The filter paused twice to allow me to change
any of the border text.
It's a way of framing your shot using the
conventions of film and a subtle means of thumbing your nose
at those who don't yet accept digital images as being "worthy".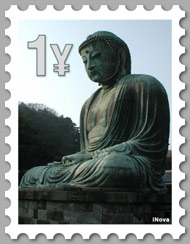
Borders that look like perforated stamps.
- Three sizes with different perforation
counts.
Check out the info
page on these.
Pictured: My idea of what a nice one-yen
stamp might look like if it used my image. But, that's just me.
- iFX. (New,
only in V.3.0 and later)
Several things here.
- The iRetNar series achieves results
similar to that of NASA's Retinex image processing technique.
Images that you might think were beyond
help suddenly perk up into useful shots. Or, take it to new artistic,
manipulated extremes.
- The iOldTymie filters create the
look of an exceedingly old, weathered photo.
Not just a simple sepia-toned print, but
a shot that has aged the paper, too.
- Then there is the iMprove1 filter,
which we call the Panacea Filter!
It never met a shot that didn't like it.
This filter uses a combination of techniques to sharpen and enhance
almost anything.
- iSharpPS6
series improves the sharpness of images shot with either low-
or no-camera sharpness.
And it does it without generating "outline"
artifacts.
- iFrameAverage -3, -4, -5, -6 let you stack several exposures shot "in-register"
and blend them together in interesting ways.
The result is a single image with virtually
no grain or noise or artifacts!
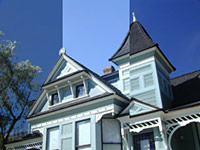 iPolarizeSky.
(Only in V.3.0+) iPolarizeSky.
(Only in V.3.0+)
- Polarize your skies without a polarizing
filter.
This page tells you more about the filter and how to use
it.
The image at right shows a normal exposure
in the center. On one side, a real polarizer has deepened the
sky. On the other side, the iPolarizeSky filter has done its
job to the center image. Which is which?
Clue: When you do this to the same image,
no offset shows at the split.
- iFourPrint.
(New: 5-megapixel versions in V.4.0)
Save ink, paper and printing time.
Open four full-size images. Click the filter.
Immediately, all four shots are grouped onto a single page for
quick print-out. US Letter and A4 pages are supported. You can
then save the big page or toss it. Making a new page is so easy,
you may not need to keep it at all.
- Six variations are here for 2 megapixel,
3 megapixel and 5 megapixel images in horizontal or vertical
format.
Each places the pictures in comic strip
reading order using the order in which you opened the images.
 You can cut the resuting page into four smaller
prints or keep them together as a story-telling group of shots
on a single sheet. You can cut the resuting page into four smaller
prints or keep them together as a story-telling group of shots
on a single sheet.
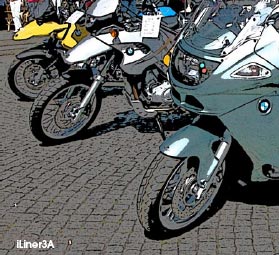
- iLiner. Major
art effects. (New)
Fantastic photo-to-art conversions that
create stunning large-scale images with delicious artistic interpretations.
Eight variations in five groups.
Here's a page that helps you understand some of the potiential,
but your own images are needed to tell the whole story.
I shoot a lot of imagery that attempts
to capture an idea. The texture of an autumn tree, the grouping
of people in a crowd, the juxtaposition of repeating shapes--anything
that appeals to me when I'm wearing my photographer hat.
Often these images lack the poetic touch
that moved me to take them. But when I add an iLiner effect to
them, a surprising number expand their poetic intent to the point
that other people see it too.
Common visions are heightened. Communication
gains an amplified visual channel by removing photographic literalness
and replacing it with artistic interpretation.
|
There is
another kind of filter in the eBook.
One that lets you shoot in any light as if you had put a color
filter on the lens of your camera. This one uses your white balance
system to trick the camera into behaving like it was looking
through a perfect color gel.
This
filter is built into the eBook's package.
You take the slip cover out from behind
the clear cover, flip it over, and there you have 48 color filters
to use with your camera any time you wish. Want to make a Christmas
scene look warmer? Pick the amount of amber you want to add,
and white balance off the blueish color patch it's "tied"
to. The camera thinks does its best to compensate by delivering
a more amber result. Instant Holiday Cheer. 12 colors in 4 strengths.
 Along with some of the filters and special techniques
are high-quality photo files to try them out on. The attempt
here is to give you as much experience in as short a time as
is reasonable so you can start applying these results to your
own images. Along with some of the filters and special techniques
are high-quality photo files to try them out on. The attempt
here is to give you as much experience in as short a time as
is reasonable so you can start applying these results to your
own images.
In fact, while you
are waiting for the eBook to arrive, try this: Go out and shoot a bunch of images that you plan
to use with the filters. Gather some shots using the WRONG color
balance, for instance. Perhaps a bunch of flowers outdoors but
shot using INCANDESCENT white balance. Now there's a test. When
you run the iCCSunnyShotIncan.9xx filter on that image your eyes
will likely fall out onto your keyboard!
Then shoot some people's faces very
close. Don't worry about cropping out hair or collar bones--get
into the face. Then run the image through the Complex Art series.
Chances are you could start CHARGING MONEY for the results you
will get. All the more reason to have a printer that spits out
tabloid-size images...
A small field guide booklet inside the
package tells you how to shoot for the filter effects in more
detail.
 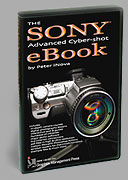 Get
the eBook. Nikon and Sony versions available now. We have
a secure order page that will allow previous Nikon eBook owners
to upgrade for low cost, too. Get
the eBook. Nikon and Sony versions available now. We have
a secure order page that will allow previous Nikon eBook owners
to upgrade for low cost, too.
Or you can call direct and order from the publisher by phone
or FAX.
Phone:(310) 475 2988 (M-F 9-5 Pacific Time)
FAX (310) 475 9486 (24hrs).
© 2002
Peter iNova. All rights reserved. Do not reprint. Simply add
a link to this page.
Reprinting except for newsworthy mention and brief quotes are
by permission only.
|
 Photoshop doesn't do
everything automatically.
 Another
series lets you warm or cool images to taste, and a variation
allows you to precisely tint your images with cyan, magenta and
yellow filtration modeled on the CC series of filters used in
chemical film camera and darkroom operations.
 Here
is an extreme example from a 995.
 These
filters bring out the best-looking results from a digital equivalent
of "push" processing. You get more grain, just as you
do with film, and the dynamic range is somewhat limited, but
you retrieve useful images from otherwise impossible exposures.
 make them look artificial. These filters provide
several different ways of handling the idea and cause varying
degrees of repair and diffusion to sit on top of the highlights.
 If
you convert a color image to black and white in Photoshop, your
means of doing so are many. You can change the image to monochrome
by throwing out all the color in the Hue and Saturation control,
or you can convert the image into Lab color and keep only the
luminance channel.
 On the CD three versions exist in different strengths.
 iPolarizeSky.
(Only in V.3.0+)
 You can cut the resuting page into four smaller
prints or keep them together as a story-telling group of shots
on a single sheet.
 Get
the eBook