|
Secrets of Digital Photography PS 6+ iNovaFX Work-Arounds* |
*These are only needed for the first version of iNovaFX Photoshop Action Filters that appeared with the very earliest Nikon eBooks. They are not needed for the Actions that appear in the Sony eBook or for users of the actions that have appeared since version 3.0 of the Nikon eBook.
It had to happen! The very month the iNovaFX filters first hit the street (November, 2000), so did a new version of Photoshop. Fine, except that the iNovaFX filters are MADE for Photoshop and Photoshop's new version 6.0 changed a few of the rules...
A small percentage of the 5.0/5.5 filters that appear in eBook Versions 1-4 don't work correctly with Photoshop 6.0's new layer naming and blending procedures. Those incompatibilities carry over into PS 7.0 and CS as well. All iNovaFX Photoshop Actions that were made in PS 6, 7 and CS (8) are mutually compatible.
Any filter that uses a "blending mode" in its process under Photoshop 5x requires rewriting for future Upgrades (fixed in eBook Version 3.0's filter set and later). These are prevalent in the iSORecover.atn series and certain iComplexArtFX.atn series filters. (See articles farther down for details about "fixed" iNovaFX Filters.)
So here are some details that will help you modify the current filters to work with PS 6.0.
Run a filter that seems to be misbehaving
A good test case is the iComplexArtFX series iCanvasPainting3. It can be used on a small or reduced-size image for speedier results. When it is finished working, three layers will be stacked. From the bottom up they will be labeled Background, Layer 1 and Posterize 1.
Notice that the highlighted Layer 1 is being expressed in "Color Dodge" blending mode. This is where Photoshop 6.0 is very different from Photoshop 5.5. In PS 6.0 the blending mode offers a new "feature"--Advanced Blending Mode, and it is in effect whether you want it or not. So we must deal with it.
The immediate effect is to create a Painting that looks wrong, as if the underlying paper or canvas were not completely covered with paint. Double-click on the Layer 1 title and a whole new window will open up that nearly fills the screen. Only a portion of it is shown here.
This includes the slider control called Fill Opacity under Advanced Blending. That's the culprit. Notice that it is set to 100%? This causes the Blending to behave in a new way, more extreme than the way it behaves in Photoshop 5.5. Slide this down to 85% and as you do, the qualities of the simulated Painting the iNovaFX Filter has produced will change dramatically.
Interactively, you can change the Blend Mode, it's Opacity, and the new Fill Opacity slider. Here I have moved it to almost half-strength and elevated the General Blending Opacity to full. Your mileage will vary but for many images, this is a good starting place.
The new Photoshop feature is a Good Thing overall. it allows a new level of control to Blending Options and future iNovaFX Filters will take advantage of its power. For the current set of iNovaFX Filters, it means that users will have to be aware of the strange differences it produces and look to the Advanced Blending control for better results.
In the iSO2Taste Filter, for instance, if the image appears washed out you may need to back the Advanced Blending down to somewhere around 70% to 90% before using the General Blending Opacity slider to tune the exposure.
More will be added here as we discover better ways to get the most from PS 6.0.
PS 6.0 and the Unsharp Mask (Interesting stuff.)
Thought you were going nuts? Unsharp Mask behaving a bit odd? It's true, it's true. Photoshop 6.0 has a different effect on things than Photoshop 5.0 and 5.5 have.
It's sharper, for instance. The New, Improved PS reaches farther into the sub-pixels than does the older versions. At least in the "below 0.3 pixel radius" influence is concerned.
When you invoke the Unsharp Mask, a dialog box asks you for three things.
- Amount or strength of the action.
- Radius of the influential area of the effect.
- Threshold of activity.
Amount of the action is in percentage. A 100% setting means it will be "full strength," but you CAN go for 500% if you dare. That would be 500% of full strength, and when the next control's setting is low, that might be a good thing. Usually, it's a Bad Thing, because it over-does the sharpening effect.
Radius of the influence area means how far out from the center of the Pixel In Question the sharpening effect will have influence. PS5 feels like it measures from the center, but PS6 feels like it starts at the edges of the pixel working the nearby pixels into a sweat quicker than the Unsharp Mask routine in PS5. In most situations this would hardly be noticed, since tiny fractions of a single pixel are less-often used.
But I use them, and when you get the hang of using 0.5 and smaller radii, good things happen. At 0.25-pixel radius, a qualitative break happens in both versions. Below this number, nearly zero affect can be seen.
Subtle corrections like Radius = 0.3 pixels now are expressed as if they were reaching nearly halfway across adjacent pixels. In PS 5, they behaved less obviously. Tiny radius numbers like these work with large Amount numbers. It would not be unreasonable, in PS5, to enter "0.25 radius / 130%" for a subtle tweak to the sharpness of an image. But these numbers may produce extra phenomena in PS6.0.
How would this affect anything? Check out this iDeNoise'd image.
Here the original and three de-noised images appear. If you go to the DeNoise Filter page you can upload these iNovaFX Photoshop Action Filters and play with them yourself.
I developed a denoise filter in PS5.5 but it didn't work the way I expected in PS6.0, as you can see in the two middle images. The eyelashes went crazy. Fine detail was getting too much "sharpening".
Turning off the last Unsharp Mask instructions in the filter gave the last panel's result. Clearly, PS6 handled these differently. In PS5.5's Unsharp Mask engine, no heavy sharpening effect was seen with 0.2 pixel radius, 500%+300% UM sequential applications. PS6 went nuts with the cumulative 800% at this tiny sub-pixel radius.
So I made a 6.0 version without the minor Unsharp Mask tweak. You can get both or either on the DeNoise page.
If you use PS6 and need just a hair of tweak to make your shot come through, experiment liberally with the Unsharp Mask control. My feeling is that entry radius numbers for Unsharp Mask begin lower than before -- if you want results similar to PS5's.
PS 6.0+ and PS 5.5 Color Management (Useful stuff.)
In the eBook on page 111 you will find the method for flattening Photoshop's influence over the way an image is portrayed on-screen while you work on it. This feature falls under the broad category of color conversion and allows sophisticated, high-accuracy, ultra-tweaked color management. The need for this level of finesse is below most of our horizons.
For most of us, getting Photoshop to NOT adjust the color upon opening a file is what we need. No sense having Photoshop portray the image on our computer screen one way while we work on the shot, only to find that when we see it in every other program it looks wrong.
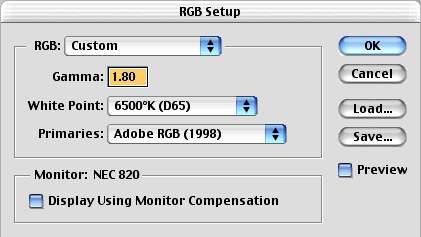
So the item on page 111 turns it off. Now images open without being converted to a new viewing and manipulation paradigm. This is done in PS 5.5 through the File > Color Settings > RGB Settings and File > Color Settings > Color Profiles menu threads.
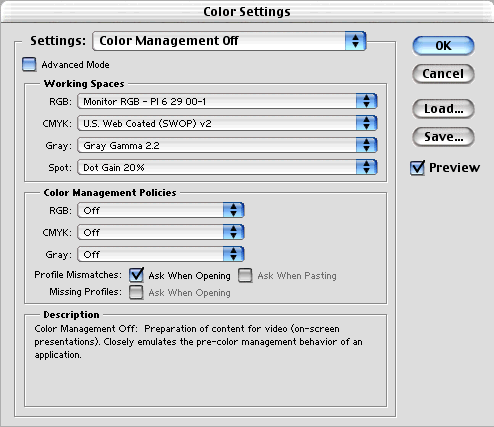
For PS 6.0 the way you get to the settings is slightly different. Edit > Color Settings > Color Management Off. That does the trick.
PS 5.5 menus look like this
And the PS 6.0 menu looks like this
The items inside the Working Spaces sub-window are automatically placed there when you choose Color Management Off.
Get the eBooks. DSLR Nikon D70, Coolpix and Sony Advanced Cyber-shot titles available.
We have a secure order page that will allow previous eBook owners to upgrade for low cost, too.
Or you can call direct and order from the publisher by phone or FAX.
Phone:(310) 475 2988 (M-F 9-5 Pacific Time)
FAX (310) 475 9486 (24hrs).
© 2004 Peter iNova. All rights reserved. Do not reprint. Simply add a link to this page.


